In short, the key idea is to prevent white from playing h2-h3!
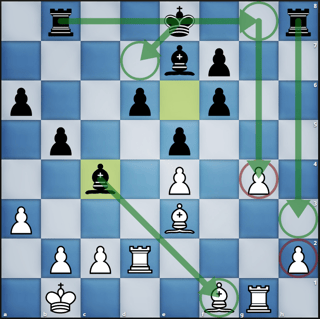
Bc4 forces the exchange of light square bishops, and thus, sets up Rh3 which blocks the h2 pawn and keeps both the h2 and g4 pawns weak.
Concretely, the only piece currently covering h3 is the light squared bishop on f1, so by trading the bishop with Bc4, which white cannot prevent as Bg2 leaves h2 hanging, white has no immediate means (e.g. a rook on g3 would prepare h3 but it's too slow) of preventing black's imminent Rh3.
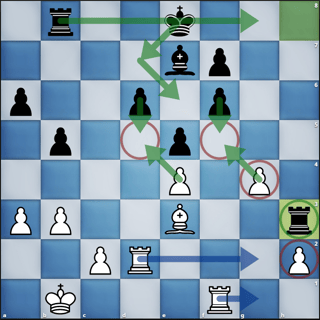
Black's bigger idea is to create two connected central passed pawns!
More precisely, the plan is:
- to pressure
g4, and binding white's rooks to the defense ofg4andh2, - bring the king to
e6to prepare thed5advance to trade thee4pawn, then go back toe6and similarly prepare trading white'sg4pawn withf5, - after which black is left with a passed
fandepawn, that is, two connected passed pawns!
Suppose Bc4 is not played, then white gets to play h3, and thus maintaining their bind on light squares and killing black's prospect of
creating two connected passers.
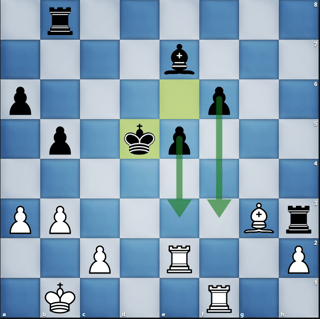
In the game itself, Ivanchuck decided to trade the g-pawn quickly (by advancing it to g5) in order to get rid of one of his weak pawns, after which Anand still managed to execute his plan as all he had to ensure was trading the e4 pawn by playing d5. Here's the position that transpired in the actual game, where Anand's plan has been executed to perfection:
Quite an exemplary game showing Anand's deep positional understanding: note the move Bc4 a priori undermines a couple of chess principles:
it willingly trades black's only good bishop, after which black is left with a hemmed-in dark squared bishop vs white's active one. Moreover, black allows
their queenside pawns to become shattered into 2 (isolated) islands, and in doing so having less chance of dominating1 2-vs-3 on the queenside.
In spite of all these at-first-glance-unfavourable aspects of the move, Anand beautifully realised controlling the h3 square outweighs them all, since preventing white's h2-h3 pawn advance to support g4 is the only way black can maintain the prospect of active play in the pawn skeleton that had transpired, as we discussed above.
Here's the game itself:
 [title "Continuation after 20...Bc4"]
 [fen ""]
 [startply "40"]

 1. e4 c5 2. Nf3 d6 3. d4 cxd4 4. Nxd4 Nf6 5. Nc3 Nc6 6. Bg5 e6 7. Qd2 a6 8. O-O-O h6 9. Be3 Nxd4 10. Bxd4 b5 11. f3 Qa5 12. a3 e5 13. Be3 Be6 14. Kb1 Be7 15. g4 Rb8 16. Nd5 Qxd2 17. Nxf6+ gxf6 18. Rxd2 h5 19. Rg1 hxg4 20. fxg4 Bc4 21. b3 Bxf1 22. Rxf1 Rh3 23. Re2 Kd7 24. g5 Ke6 25. gxf6 Bxf6 26. Bd2 Be7 27. Be1 f6 28. Bg3 d5 29. exd5+ Kxd5 30. Rf5 Kc6 31. Ref2 Rh6 32. Kb2 Kd7 33. Re2 Bd6 34. Rf3 Rc8 35. Be1 Ke6 36. Rd3 Rh7 37. Rg3 Bc5 38. Ka2 Rd7 39. Rc3 Rcc7 40. h4 Rd1 41. Bf2 Bd6 42. Rg3 e4 43. Rxe4+ Be5 44. Rxe5+ fxe5 45. Kb2 Rd2 0-1
1: Domination in this context means: the side with the minority (less pawns) achieving a setup (e.g. a blockade) where neither of the majority pawns of the opponent can (easily) advance. Typical to the Sicilian pawn structure on the queenside, one such setup could be white's pawns being on a2-b3-c2 and black's pawns pinning down on dark squares with a5-b4. For an example see the setup by Caruana (as black) in his candidates game vs Karjakin (e.g. around move 22), where indeed one of his positional mistakes in that game was to give up the domination with 26...a4.


